Sunday 30 June 2013

Summer War Gaming in North Devon - Battle of Balaclava

This weekend has seen our annual trip to "deepest darkest" North Devon to spend time with Chas Carter who is our host and games miester. I like to think of our summer games as the war gamers answer to the Glastonbury Festival, giving us the opportunity to get close to nature whilst enjoying great hospitality and gaming fun.

The Heavy Brigade in action at Balaclava

Needless to say, the camera goes with me on anything to do with war gaming and so here follows a little record of the fun.


The Battle of Balaclava was our set piece get together this year and I was given the honour to assume the role of The Honourable Brigadier General Sir James Scarlett commanding the Heavy Brigade.

Sir James Scarlett
We all gathered yesterday for our briefings and a full day of war gaming the battle which, as it happened, turned out to be a very similar result as to its historical predecessor. The rules used were Black Powder, not a set that I use myself, but the rules stood up well to the test of 11 players and about 20 units on each side.

The briefing in front of the table
The briefing set up the historical context of the battle with the Anglo Turkish troops asleep in their camps as the Russian attack came in over the River Chernaya. The Russian objective was to push over the Causeway and exit the southern table edge to cut off supplies from Balaclava harbour supporting the siege lines around Sevastopol.

The Causeway Heights with the Northern Valley nearest to camera
All quiet in the British camp with Turkish gunners manning the redoubts on the Causeway
The relationship between the British commanders was a difficult one to say the least, and Chas had chosen our players to match with the styles of their historical counterparts. These styles were a highlight of the game as the various British senior commanders struggled to decide where to place the emphasis in extra command points.

As a mere Brigadier General, mine was not to question but to simply do, and with the blunder rules in Black Powder added in to the mix, some allied movements became very un-coordinated. It was not uncommon to hear the comment from an astounded commander on receiving his orders for the next turn, "What's this, the man's an idiot, I can't do that!!" History repeated.


"Russians, and fousands of em!!"
The Russian forces entered the table in the early hours with the British forces unaware of their approach (The British cavalry brigades were forced to wait three moves before testing to respond to the Russian advance, simulating the surprise of the attack).

The Russian Infantry made straight for the Turkish guns on the heights
As the Russian infantry crossed the bridge and ford, the columns struggled to clear the river and press on quickly for the first of the Turkish gun emplacements. The Turks, aware of the masses approaching their lines opened fire inflicting casualties and disorder on the Russian columns.

Systematically the Turkish gunners were put to the bayonet, not however without causing casualties on the way in.
Finally both the Heavy and Light brigades sounded the stand to arms and after a meeting between Raglan and Lucan about orders and messengers, the two brigades set off down the Southern Valley to support the Turkish emplacements and protect the approach to Balaclava.

Finally the cavalry were called to arms and set off down the Southern Valley
As the Heavies trotted down the valley in perfect lines, as if on General Officers Parade, the first elements of the British 4th Division and General d'Allonville's French cavalry started to arrive from Sevastopol.

The Royal Scots Greys led the advance of the formidable Heavy Brigade
The Russian brigade under the fearless Duke Nathanovich Goodyearovski gamely marched along the Northern Valley to challenge the Allied reinforcements and delay their impact on the struggle developing for control of the Causeway.

Russian infantry under Duke Nathanovich Goodyearovski challenge the arriving British reinforcements

With the first six moves completed, time to take stock and grab refreshments
The Heavy Brigade under General Scarlett, wheeled in to two lines and charged up the side of the Causeway to attack the victorious Russian infantry. One column managed to form square and fend of the fearsome British attack, but their comrades in the other column were not so lucky. After some brief sabre work it was all over and two Russian columns were removed from the order of battle.

"Fox" - The Heavy Brigade strike
Whilst the Heavy Brigade were causing consternation in Russian ranks at the eastern end of the Causeway, their brothers in arms of the Light Brigade were getting stuck in on the western end ripping through an Hussar and Cossack regiment to clear the way for supporting Anglo Turkish infantry.

"View Haloo" - The Light Brigade support the heavies followed up by Allied infantry
The battle now developed into a slugging match between the Russian infantry and cavalry trying to hold their foothold on the Causeway so as to allow their artillery to be brought forward, and the British cavalry trying to push them back to allow the Anglo Turkish infantry to retake the heights.
Which side would succeed?

The struggle erupts for control of the eastern end of the Causeway
The artillery casualties inflicted on the Russian infantry had taken its toll and with British cavalry threatening to attack they took refuge in the Turkish emplacements, which gave them protection from small arms and artillery fire, plus kept the cavalry at bay. However as the Anglo Turkish infantry columns charged into the Russian masses, the emplacements became a death trap.

Suddenly the Heavy Brigade open gaps in the Russian lines
One by one the Turkish emplacements were cleared of Russian troops and despite counterattacks from their cavalry, the British cavalry held the ground in between.

As the Russians seek shelter in the emplacements the Allied infantry moves to support the cavalry

Anglo French troops arrive to move into the Northern Valley

The Turkish infantry seek revenge for their fallen gunners

The Heavies go in yet again
As the Anglo French troops on the western end of the Northern Valley were joined by the British Guards of General Bentick's 1st Division, the Russian position became more and more untenable.

Anglo French infantry advance on the Russian right flank

Again the Heavies send the Russian Bear packing

The Anglo Turkish infantry start to reclaim the Causeway with the Light Brigade supporting their flank

Goodyearovski's Russian infantry contest the allied advance, suffering under the British volleys
With the final melees going to the Allies, the Russian troops started to fall back from the causeway, and with the road into Balaclava an impossible objective the game ended.

And then it was all over - Andy's expression (far right) says it all.
We had gamed from 10am to 7pm and all had a great day with lots of laughs, banter and some great moments in history recreated in our simulation of the famous battle.

Many thanks to Charles and Clive for setting up a great days entertainment. Thanks also to Steve M, Vince, Andrew, Andy, Nick, John, Nathan (Duke Goodyearovski) and Mike for their contribution to another great game in North Devon.

Talk for next year looks like it could be the Third Crusade!!

Monday 24 June 2013

New Xan British - Peninsular War

Presenting the new Xan Peninsular War British Line infantry, available in the UK from Empress Miniatures

I was really excited about this range of figures when I saw them at Salute this year. So imagine my joy when they recently launched the new British infantry figures. I have been very keen to paint these guys, and have been working on this first unit in recent days.

Xan miniatures, 7th KGL with AB mounted colonel, Colours from GMB Flags
These models are a very welcome addition to the ranges of 18mm Napoleonic figures now available for us Peninsular War fans. They are very well proportioned with plenty of detail to pick out and a good variety of poses to form a complete unit. I really like them and I can see myself using a lot of these guys to complete my British collection.

Not only that but I also have some of their lovely French Legere on the painting desk so will aim to have some pictures of them with some comparison shots next to my ABs.

If you are thinking about collecting in 18mm then I would strongly recommend looking at Xan as a range to have in your collection.


As part of helping to illustrate how well various ranges compliment each other I have pictured the new Xan battalion next to my AB, CGM and Fantassin units. I think they all work well together and I am happy to have all the ranges together on the table adding variety to the overall look of my army.


Xan on left, CGM on right with AB Colonel, Colours from GMB Flags

Xan on left, CGM on right with AB Colonel, Colours from GMB Flags

Xan on left, CGM on right with AB Colonel, Colours from GMB Flags

Xan on left, AB on right with Fantassin skirmishers and AB colonel, Colours from GMB Flags

Xan on left, AB on right with Fantassin skirmishers and AB colonel, Colours from GMB Flags

Xan on left, AB on right with Fantassin skirmishers and AB colonel, Colours from GMB Flags

Xan on left, Fantassin on right with AB colonel, Colours from GMB Flags

Xan on left, Fantassin on right with AB colonel, Colours from GMB Flags

Xan on left, Fantassin on right with AB colonel, Colours from GMB Flags
All the manufacturers links can be found on my Links section

Thursday 20 June 2013

Vimeiro Hill - The Re-fight, Carnage & Glory II

Vimeiro Hill the re fight and this time it's serious!


Well not really, but now Tom and I feel we have a handle on how to get the best out of British Reverse Slope tactics, we decided to re fight Vimeiro Hill last played at the Legionary Show in Exeter earlier this year, see the post for 6th of May.

To stage our re fight we were joined by, my other son and Tom's younger brother, Will and, my old mate and neighbour, Steve, who played this scenario as the British commander at Exeter. So the next generation of wargamers would be taking the lead in this game supported by Steve and myself, otherwise known as the "Old and Bold".

The table set up and the forces arrayed
The picture above shows the layout for the scenario, with Vimiero Hill to the left and the cork woods nearest to camera. Top left is Vimiero itself with fields and vineyards along the road into town. The little scrub markers on Vimiero Hill show where the military crest is to allow the British to judge when their units are out of sight to French units on the low ground

Everything ready to go

British Order of Battle

French Order of Battle

We decided to fight this scenario following as closely as possible the original plans of the two commanders Junot and Wellesley.

So the brigades of Anstruther and Fane were set up on Vimiero Hill as per Wellesley's instructions. Likewise we adopted the entry points followed by Junot's brigades. To simulate Junot's separate attacks by his line infantry and reserve grenadiers, the French could not advance with the grenadiers until the line units were engaged in musket volleys of the main British line. In addition Acland's brigade would only activate and come on to the table if French units threatened to enter Vimiero town, simulating Wellesley's leaving the town un-garrisoned, and only entering it to protect his baggage after it became clear that the French were going to enter it also.

Sir Arthur Wellesley's force laid out by brigade

Junot's force

52nd and 43rd Light Infantry, part of Anstruther's brigade

French Foot and Horse artillery
For this game Tom was taking the role of Sir Arthur Wellesley and was keen to try out the tactics we practised in our training mission, see the 28th May post for details.

His brother Will, who has just surfaced from AS exams this summer and so has had less practice with C&GII, took the role of General Junot, supported by his able Aide de Camp, Steve who has played the system a few times previously as we got to grips with it.

Yours truly ran the laptop.

The view from the hill as the French advance is greeted by the Royal Artillery
So with the scenario set to run for twelve turns, the brigades of Charlot and Thomiere struck out across the valley floor set to throw the British Leopard back into the sea for the greater glory of the Emperor.

Thomiere and Charlot's brigades started the attack

Junot held the Combined Grenadiers back
As the French advanced in column the British guns played on them with Thomieres brigade taking the worst of it as Charlots columns had the cover of the woods on their approach.

Anstruther's Light Battalion screen the forward slope

The British guns played on the columns during the advance
With the British guns causing early casualties, Junot pushed both his foot and horse guns forward to counter battery the British gunners, with modest success.

Junot's guns reply to the British barrage

Thomiere's brigade swing off the road towards the hill

The Grenadiers in reserve await the order to advance
Eventually the two skirmish lines came to grips with the riflemen of Anstruther's light battalion able to inflict early casualties amongst the officers and NCOs of the 86me Ligne. The voltiguers unable to find the main British line, waiting patiently behind the ridge line, were forced to direct their fire back at the British light battalion in open order, to their front, with little effect.

This fire together with the casualties caused by the artillery on the approach took its toll and as the lead French column of the 2/86me marched up the slope and finally identified the 2/95th Rifles in line to their front, the order to charge was given.

Instead of a cheer the French unit started to give way and retired back down the slope. The 1/86me Ligne was shaken by their colleagues withdrawal and halted at the foot of the slope, protected from the artillery fire by the dead ground. General Thomieres was forced to join the 2/86me to re-establish their composure, and was eventually joined by Junot as well, to add his encouragement.

Thomiere's skirmish line contacts Antruther's Light Bobs
Meanwhile on the British right flank, General Charlot's troops were observed emerging from the light woods. Charlot was keen to re-order his men after their gruelling hike through the trees and set his skirmish line to screen his troops in the dead ground of the hill as they prepared to make their own assault.

Fane's Light Battalion face off against the approaching brigade of GDB Charlot

The French guns attempt to drive off their British opposition

Thomiere's battalions discover the British lines

The skirmish battle in full swing on the British right
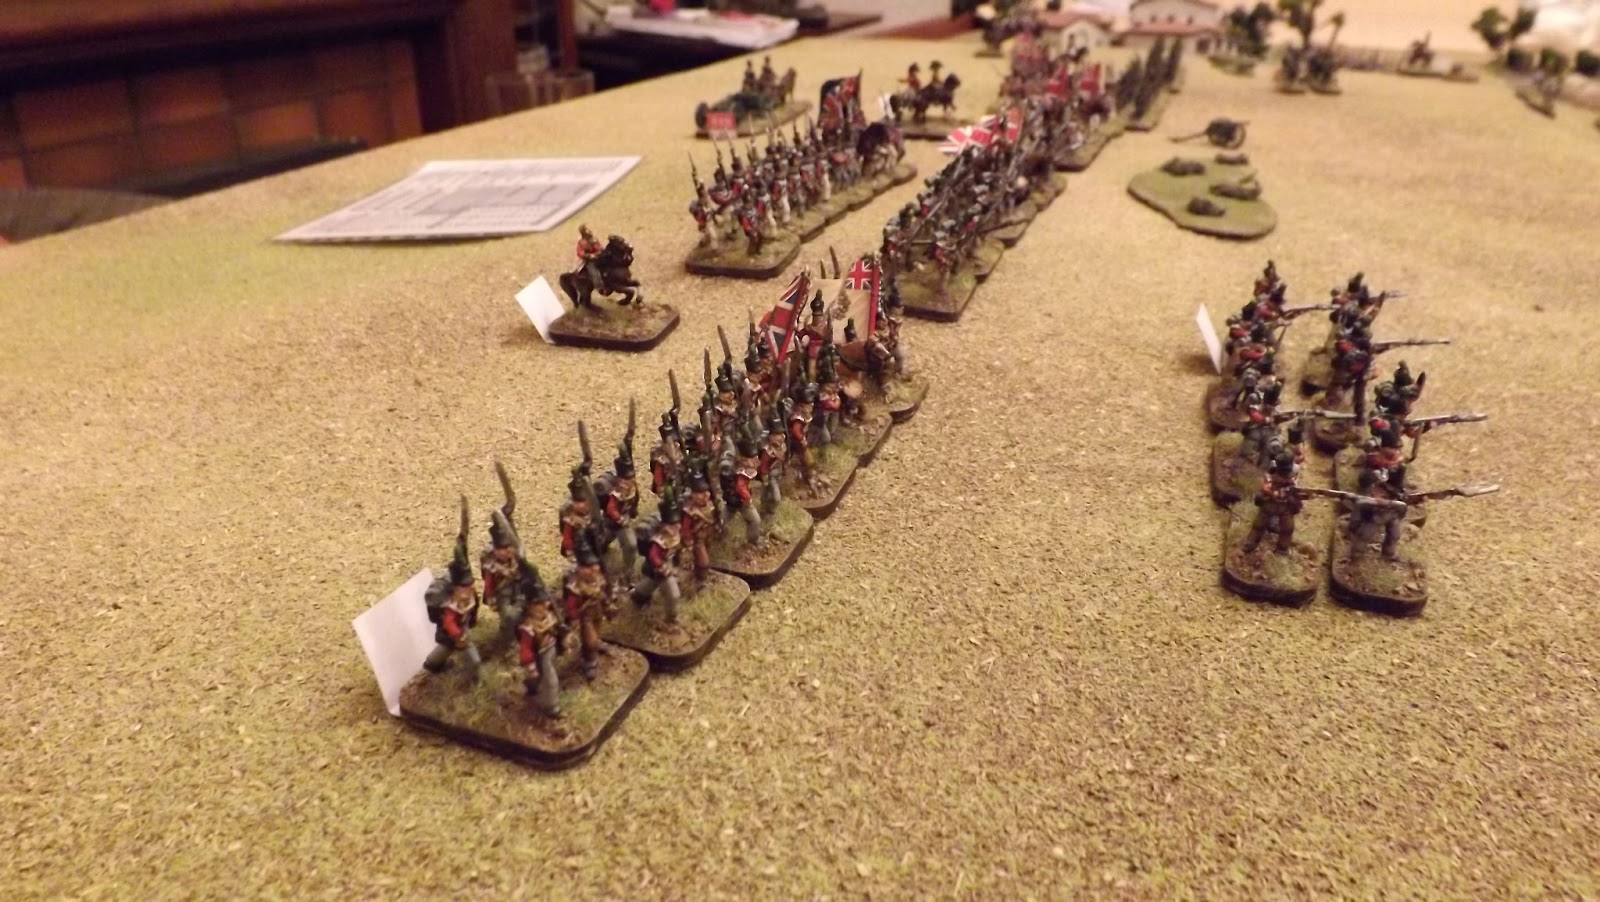
With the British line contacted on their left Junot was free to support his attack with the Grenadiers and cavalry. The Grenadiers doubled across the valley, attempting to minimise their time under British artillery fire and to come up quickly to support Thomiere's and Charlot's men.

As the French columns close on the British lines, Wellesley calls forward his cavalry from reserve
General Wellesley remained calm as the French columns closed on his lines. With Thomieres brigade stalled on their left flank, General Anstruther was free to move his light battalion to the centre of the British line that was now most threatened by the approaching Grenadiers.

In addition the British gunners who were forced to retire behind the ridge due to the close range fire from the French guns, bravely came forward and resumed their fire as the French columns closed in.

As Thomiere's men fell back their place was taken by General Margaron's cavalry led forward by the 5me Provisional Dragoons. Wellesley was compelled to bring forward his own cavalry to counter the threat, sending the Portuguese to the opposite flank to threaten Charlot's columns, causing one of them to form square to protect the whole French line.

The French dress the ranks prior to moving up the slope
All was set for the final attack, with just two moves remaining to get a result.

The Grenadiers advanced in the centre supported by the artillery who prolonged their guns up the hill to fire in to the British lines. However the British line had stepped forward to the crest and with the French charging they masked their artillery who were in canister range. The British artillery had no such problem as they were now in the British line, and promptly shot up the French horse guns.

The 3me Grenadiers were met by a crashing volley at 25 paces from the 50th Foot, knocking down 250 of the bear-skinned warriors, and promptly counter-charging them, sent them packing.
The other battalions met similar but less crushing fire power all resulting in their retirement from the hill.

On the extreme French left the 3/82me Ligne attempted to charge the 52nd Light Infantry and took 130 casualties for their efforts forcing them back down the slope.

The52nd Light Infantry support the skirmish line 
The final attack was by the French Dragoons who charging forward attempted to ride down the 95th Rifles. Their charge was intercepted by the 20th Light Dragoons who fell back after a short melee. On attempting to follow through on to the 95th, the Dragoons fell back themselves and the Rifles in amongst the walls and broken ground atop Vimiero Hill were unmoved.

Junot's army was finished, with his Generals riding to and fro attempting to rally their shaken battalions.

The Orbat summaries tell the tale of the gauntlet the French army had run with a tired and broken force. In comparison the British are still very much a force in being.

With Charlots and Thomiere's brigades engaged, the Grenadiers and Dragoons join the assault
British Order of Battle at Game End

French Order of Battle at Game End


The Butchers Bill

Thanks to Tom, Will and Steve for a fun game. Will is keen to try and find the way to unlock a British reverse slope, so will probably be commanding French in the next game, exams permitting.

This scenario is available to download from the Scenario Links. If you play it let me know how you got on.