Thursday 31 December 2015

Talavera - Attack on the Pajar de Vergara


The Attack on the Pajar Vergara is a battle within a battle that shouldn't have happened in the way it did. This was supposed to have been a holding action to pin the allied flank and potentially draw in reserves whilst a much larger powerful force punched through the British line in the centre.

To emphasise the support role of this attack the German Division under General Leval was supposed to advance after the main attack had gone in and thus, echeloned back, prevent the forces in this area going to the support of their hard pressed and soon to be beaten comrades in the centre. 

This plan was soon upset as Leval's men lost from sight in the enveloping olive groves became disorientated in terms of their position in relation to the other attacking formations and found themselves in the lead on the French flank as they left the cover of the trees and, thus committed, attacked first ahead of the main attack.

This account reveals the difficulty faced by any modern day General Laval trying to navigate their division through this difficult terrain that, whilst providing cover from artillery fire on the approach, causes fatigue and disruption to formed troops whilst crossing it.

For our New Year's Eve re-fight of this very interesting battle within a battle we have two veteran C&G commanders eager to pick up matters where they left off in the Dawn Attack scenario where Will snatched a hard fought victory for the French by forcing his division onto the summit of the Cerro de Medellin and driving Steve's British troops off their commanding position

                   
           Brigadier General Alexander Campbell        General de Division Baron Jean-Francois Leval
                               AKA Steve M                                                                AKA Will            
The map below illustrates the approximate set up of the various units and brigades with a six gun battery of British three pounder guns and a half battery of four Spanish twelve pounder guns occupying the half finished redoubt atop the small knoll called the Pajar de Vergara.

Pajar Vergara Scenario Map
The scenario is set up to reflect the attack conducted by General Leval in that his attack seemed to suggest that his main objective was to secure the Pajar position as a means of anchoring the flank of the French main attack to his right.

Thus if the German Division is able to take and secure the gun redoubt they would shift the C&G casualty result one victory level higher in their favour.

In addition if the French commander chose to include the Poles in his plan of attack it would shift the victory condition in favour of the allies to reflect the fact that the Poles were kept in reserve by Joseph throughout the day and were not intended to support this minor attack.

Finally if the German troops on first contact with the British chose, they could use subterfuge to get closer to their enemy by pretending to be Spanish troops lost in the olive groves. If the British fell for the ruse it would limit the fire they could issue in their first volley to simulate the confusion caused, The Nassau troops used this tactic to good effect in the actual battle.

As with the historical action we commenced our game at 14.00 as the French artillery along the line opened up a tremendous barrage that presaged their attack. Leval ordered his troops to advance en colonne serree, columns that would keep their companies closed up on the ones in front. This kept them easier to control and keep in order but more difficult to deploy should the need arise.

As you will see in the picture below our attack followed a similar profile with the Voltigeur battalions the first to exit the tree line to start the softening up process with their will directed skirmish fire.

Birds eye view of the German columns picking their way through the olives as they approach the allied line, with the first skirmish shots being exchanged
As the German skirmish lines began to work their way forward the next arrivals on the tree line were the three batteries of light artillery attached to the three infantry brigades. By using the two approach roads and by skirting the olive groves on the right flank the three batteries were able to ply artillery fire across the Anglo-Spanish line to thicken the fire from the Voltigeurs.

Baden gun limber, Nassau infantry, Dutch and Hesse Darmstadt skirmishers
are the first troops to get to the edge of the tree-line and open ground
With the bulk of the fire from the lead German units directed at harassing the allied gunners on the Pajar it was soon being answered with canister from the redoubt backed up by British and Spanish skirmish fire, the latter provided by the Antequeran Light Infantry on the Spanish left who were soon engaged in pot shotting gunners from the Hesse Darmstadt battery deployed on the road to their front.

The skirmish battle well under way
The bigger guns add their fire in support of the skirmishers as both sides try to soften each other up
As the allied artillery pours on the hurt, the infantry lines move forward to support the gunners
The German columns took a move or two in the shelter of the trees to shake off  their fatigue from crossing the olive groves and time to dress the ranks prior to advancing
The German skirmishers close the range prior to their supporting columns moving forward
The British move forward on the allied left in preparation  for the impending attack
The skirmishing and artillery fire lasted a good half hour before the German columns had had time to re-order and recover their fatigue following the difficult march through the olive trees.

Suddenly the skirmish lines moved forward to be joined by nine infantry column emerging from the tree line.

Two battalions from the Hesse Gross und Erbprinz Regiment and two from the Baden Regiment made directly for the redoubt screened by Grandjean's and Porbeck's Voltigeur battalions.

One effect of the preceding skirmishing had been to fatigue the allied gunners and whilst the twelve pounder canister fire was still a potent threat it became noticeably less so as the gunners fatigue levels rose with no respite from them labour in sight.

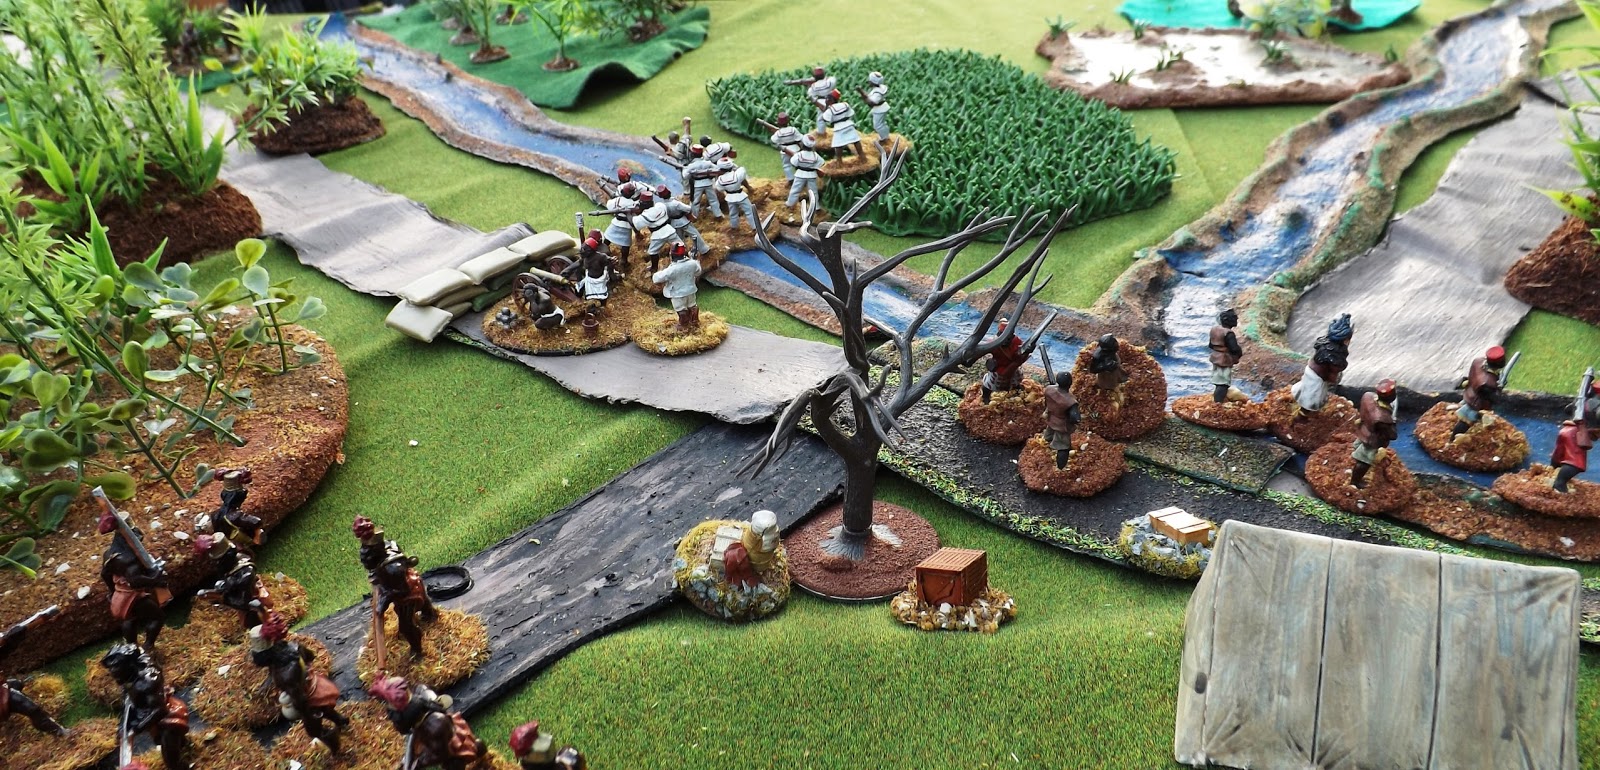
Suddenly the German columns breach the tree-line and head for the Pajar in force
As if recognising the looming threat to the redoubt, General Portago moved the second battalion of the Badajoz Regiment closer to the gun line, but then was drawn away to deal with the Antequeran Cazadors becoming shaken by fire from the Hesse gunners and the attention of the Franfurt battalion.

The shaky Spanish light infantry only held firm when joined by General Campbell himself who steadied them at the wall to their front and returned fire on the two German units to good effect.

The firing across both fronts reaches a crescendo as the two lines close
The British commander was wary of placing to much reliance on the Spanish holding firm and brought forward Brigadier Kemmis at the head of the 40th Foot and the 2nd Battalion of Detachments to form line on the Badajoz Regiment.

The Baden gunners supported by Nassau troops closest to camera attempt to pin the British as their comrades close on the Pajar
The climax of the action was approaching as Generals Grandjean, Porbeck and Leval attached themselves to the lead battalions and charged the redoubt, barely making it to the line of gabions as they were met by a weary discharge of canister.

The encouragement from the attached officers made the difference and three of the German battalions swept into the redoubt in hot pursuit of the gunners leaving from the back and also leaving most of their guns.

Generals Porbeck and Grandjean launch the Hesse and Baden infantry at the redoubt forcing the allied gunners to relinquish their defences and some of their guns as the German troops move onto the position to mop up. General Leval (118) can be seen at the centre of the attack
The distraction of the Antequeran Cazadores had caused two of the allied generals to be out of place when the attack struck, with only the second battalion of the Baden Regiment caused to pull up in the redoubt after the fire it received on the way in.

The German battalions keep the pressure on as they charge in over the redoubt striking the first of the Badajoz battalions.
The Baden battalion (162) is about to meet its nemesis in the form of HM 40th Foot to their front
The fighting was taking a toll on both armies as by 15.30 (turn 6) both army morale levels were at 86% and with failure deemed at 75% the next few moves would soon determine which would brake first. This distress became obvious as the first German brigade commander was advised his command was on a cautionary rating meaning that the fatigue was building fast.

The moment of crisis as the first Spanish battalions meet the onrushing German battalions
With both sides sensing that the tipping point was approaching for either force given one more significant blow, the opposing infantry prepared to charge and to open fire in one last attempt to wrest the initiative.

The three good order German battalions charged again with the two Hesse battalions taking on the lead Badajoz Infantry battalion whilst the second battalion of Baden infantry shook out into line to take on the 40th Foot.

"Cometh the hour" - The Provincial de Badajoz Militia step up and take the fight back to the Hesse battalions amazing everyone involved. Ahead to their left can be seen the 1/40th Foot (544) sorting out the Badeners. General Campbell can be seen top right steadying the Antequeran Cazadores
Up to this point the fire from the weaker British battalions of the 7th Fusiliers and 53rd Foot had seemed rather desultory compared with what you would expect from a British battalion and their lack of numbers couldn't have helped. The 40th Foot on the other hand were one of Wellesley's stronger battalions and so we shouldn't have been that surprised to see them pour forth a devastating volley in to the Badeners before them that staggered the battalion backwards.

The heroes of the day, the Provincial de Badajoz Militia launching their own bayonet counter attack following their two devastating volleys that retook the Pajar redoubt and reclaimed the allied guns. The smoke is from the volley from the 40th Foot.
With what looked liked the turning point as the British volley enveloped the Baden unit in smoke, the Hesse battalions charged forward at the II/Badajoz, who immediately turned tail and fled without firing a shot.

With their tails up the two Hesse battalions charged on into the I/Badajoz and like their regimental comrades they too turned tail and broke before contact leaving the third and last Spanish unit in line facing the oncoming victorious German battalions.

Turning point as the lead German battalion are about to break back off the Pajar
It looked like game set and match as the Spanish infantry seemed to collapse under the attack as the two German battalions charged at the Provincial de Badajoz Militia. Then something happened.

The Spanish militia battalion stood the first charge and with half the battalion coolly presented arms and let fly a column staggering volley that stopped the Hesse battalion dead in its tracks horrified to see General Grandjean fall mortally wounded from the saddle.

It seemed we were all holding our breath as the second Hesse battalion charged in keen on avenging this lucky shot when the other half of the Spanish militia battalion followed the example of their brothers in arms and coolly shot the second Hesse battalion to a standstill.

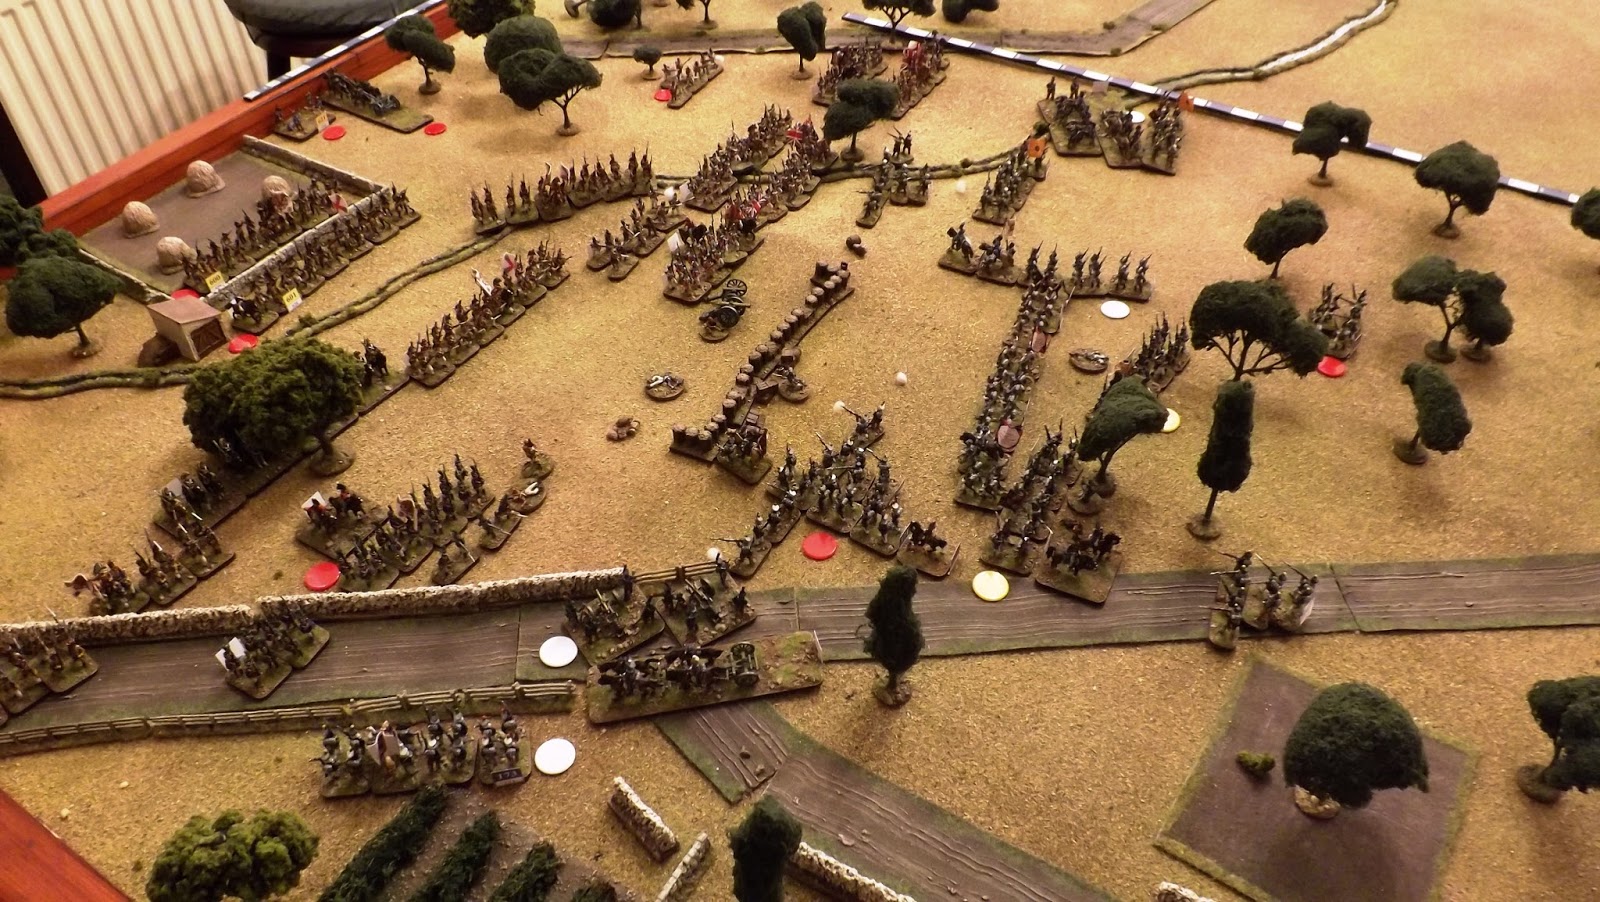
The field of battle as the German Division breaks contact leaving the field of battle to the victorious allies.
As the smoke cleared the Spanish battalion lowered their bayonets and charged in to finish things, catching one of the German battalions as they both turned tail and fled. Two of the German battalions were in full rout and the other retired shaken with General Grandjean dead and General Leval carried from the field with a serious wound following his meeting with the Spanish militia battalion.

Not only that but our game was over with the German Division at 75% army morale failure and the astonishing performance of the Provincial de Badajoz Militia to savour as an incredible game turning event.

The butchers bill and game statistics illustrate what a convincing victory the allied infantry achieved but doesn't do justice to how things looked in the final turn as two Spanish battalions broke and fled without firing a shot.

You have to feel for Will commanding the Germans after his careful approach and full bloodied assault seemed to have paid dividends especially with the Nassau battalions and Baden artillery able to successfully tie down the other British brigade. Then with victory in his grasp to have a Spanish militia battalion, pull a bit of an "Albuera" on him was hard to watch, but was a fantastic end to a very close well fought battle. We are looking forward to playing this scenario again and Carnage & Glory is the rule set that just keeps on giving!

Talavera - Pajar Vergara       
Major victory for the Allied Army as of Game Turn: 9 

The Allied Army has suffered losses of: 
[ 4%]    354 men of all arms   incl.
[ 1%]    122 prisoners of all arms
[ 4%]    327 bayonets 
[ 0%]      0 sabres 
[ 9%]     27 artillerists                   
11 cannon[s] lost 
Honours: [547] Kemmis' Bde. Light Bn.

The French Army has suffered losses of: 
[15%]    984 men of all arms   incl.
[ 1%]    109 prisoners of all arms
[15%]    936 bayonets 
[11%]     48 artillerists                    
6 cannon[s] lost 
Honours: [160] III Fuss Batterien Steinmetz
Losses include 2 General[s]:        
[118] Baron Jean-Francois Leval - Dressing wound        
[121] Balthazard-Grandjean - Mortally wounded

-----------------------------------------------------------------------------------------------------------------------
Talavera - Pajar Vergara      As of Game Turn: 9 
Division Alexander Campbell - Defend  
[ 517] Brigadier General Alexander Campbell - Active C [875 paces]    
[R] [ 548] Lawson's Brigade                  10/ 135      C          Shaken                 
[R] [ 621] 1st Battery                             17/ 131 [ 1] D+      Shaken             

Brigade William Myers - Defend    
[ 518] Lieutenant Colonel William Myers - Active C [450 paces] 
[ 541] 2/7th Foot                                     19/ 369      C- [sk] Formed    
[ 542] 2/53rd Foot                                     0/ 483      C- [sk] Formed            
[ 543] A. Campbell's Bde. Light Bn.      17/ 144      C  [sk] Formed   
    
Brigade James Kemmis - Defend    
[ 519] Colonel James Kemmis - Active C [450 paces] 
[ 544] 1/40th Foot                                   26/ 644      C+ [sk] Formed    
[ 545] 97th Foot                                        0/ 452      C+ [sk] Formed            
[ 546] 2nd Battalion of Detachments        5/ 557      C- [sk] Formed              
[ 547] Kemmis' Bde. Light Bn.                 8/ 236      C+ [sk] Formed    
  
Division Marques de Portago - Defend  
[ 528] Major General Marques de Portago - Active C [725 paces] 
[ 553] El Rey A                                               0/ 229      D        Formed              
[ 554] El Rey B                                                0/ 231     D        Formed                 
[R] [ 600] 1st Bn. Badajoz Regiment            72/ 499      D-      Shaken               
[ 601] 2nd Bn. Badajoz Regiment                 50/ 507      D-      Formed           
[R] [ 602] 2nd Cazadores de Antequera      120/ 437      D- [sk] Disorder          
[ 603] Imperial de Toledo                                0/ 792      D-      Formed             
[ 604] Provincial de Badajoz Militia               8/ 569      D        Formed        
[ 605] Provincial de Guadix Militia                2/ 560      D        Formed              

Strengths: losses/active   
327/6249 Bayonets     
0/460 Sabres    
27/266 Artillerists    
11/1 Cannon
   
354/  6975 Total of all arms           
13 Standards present 

Legend:    
[D] Denotes dispersed    
[Y] Denotes In rout    
[R] Denotes halted in disorder, in retirement or retreat    
[W] Denotes no advance unless accompanied by officer

-----------------------------------------------------------------------------------------------------------------------
Talavera - Pajar Vergara      As of Game Turn: 9 
Division Baron Jean-Francois Leval - Attack  
[ 118] General de Division Baron Jean-Francois Leval - Dressing wound B- [875 paces]
    
Brigade Heinrich Freiherr von Porbeck - Attack    
[ 119] Oberst Heinrich Freiherr von Porbeck - Active B [450 paces] 
[ 160] III Fuss Batterien Steinmetz                  7/ 183       C       Formed    
[W] [ 161] I.von Harrant Nr.4 (Baden)          17/ 359       C- [sk] Formed     
[Y] [ 162] II.von Harrant Nr.4 (Baden)       107/ 260        C- [sk] Rout          
[ 163] I.Nassau IR Nr.2                                   0/ 360        C- [sk] Formed        
[ 164] II.Nassau IR Nr.2                                  0/ 386        C- [sk] Formed    
[ 165] Porbeck's Voltigeur Bn.                      25/ 292        C- [sk] Disorder      
    
Brigade David-Hendrik Chasse - Attack [No Advance]    
[ 120] Generalmajor David-Hendrik Chasse - Active C [350 paces]    
[R] [ 166] 3m3 Artillerie a Cheval Trip        26/ 121         C       Shaken        
[ 167] I/2me Regiment Linie                           7/ 386         C- [sk] Formed        
[ 168] 2/4me Regiment Linie                         14/ 364        C- [sk] Disorder          
[R] [ 169] Chasse's Voltigeur Bn.                  36/ 118        C- [sk] Shaken        
    
Brigade Balthazard-Grandjean - Attack [Retire]   
[ 121] General de Brigade Balthazard-Grandjean - Mortally wounded B [450 paces]    
[R] [ 170] III. Fuss. Batterien Venator           15/  81          C       Disorder          
[R] [ 171] 1/Gross und Erbprinz Nr 4             91/ 307        C- [sk] Shaken            
[Y] [ 172] 2/Gross und Erbprinz Nr 4           154/ 217        C- [sk] Rout          
[ 173] Rheinbund Bttn von Frankfort               0/ 391         C- [sk] Formed    
[ 174] Grandjean's Voltigeur Bn.                      8/ 217         C- [sk] Formed        
    
Brigade Feliks Potocki - Attack    [ 122] Oberst Feliks Potocki - Active C [350 paces] 
[ 175] I. IR Nr 4 (Polish)                                  0/ 761          C  [sk] Disorder      
[ 176] II. IR Nr 4 (Polish)                                 0/ 782          C         Disorder      
[ 177] Potocki's Voltigeur Bn.                          0/ 260          C  [sk] Disorder      

Strengths: losses/active   
459/5460 Bayonets    
48/385 Artillerists     
6/12 Cannon
507/5845 Total of all arms           
11 Standards present 
Legend:    
[D] Denotes dispersed    
[Y] Denotes In rout    
[R] Denotes halted in disorder, in retirement or retreat    
[W] Denotes no advance unless accompanied by officer

A great game to finish 2015 with more to come on JJ's with a review of the year and a look forward at plans for 2016.

Thank you to everyone that has joined in the fun here on the blog, I really appreciate the comments and discussion generated and would like to wish everyone a Happy and Peaceful New Year.

JJ

Tuesday 29 December 2015

Deepest Darkest Africa with Donnybrook


Whenever I plan to go up to North Devon for our annual post Xmas pre New Year game at Chez Chas I am never really sure quite what to expect.

Last year we were battling in the American Civil War and recreating events surrounding Stoneman's Raid  at the Danbury Iron Foundry in 1865. This year would prove to be quite something different.

ACW Skirmish Stoneman's Raid 1865

This year our game was set in late 19th century Colonial Africa, deep in the Congo jungle at a tributary of the River Uele.

At this crossroads of narrow trails crossing one of the many small rivers that wind their way through the thick jungle foliage an unholy alliance of Arab Slave Traders, River Pirates and a tribal group from the native Azande people that had been disturbing the peace in their own way had been driven by military columns sent into the forest from the various Colonial Powers that had been subjected to the depredations of these three groups in recent months.


The rules we were using for the day were the recently new set of skirmish rules by Barry Hilton and Clarence Hamilton "Donnybrook" which was my first play through, so I was keen to see how they worked.


The set up below with my annotations should help you picture the scene. The scenario simply had the three alliance players in the centre each with three units of different size and abilities, based on groups of four (excellent), eight (bulk standard regular) and twelve (cannon fodder) figures supported by two to three characters such as principle leaders and in my case as the River Pirate leader, a witch doctor and second warrior leader as well.

The basic idea is that combat from shooting and melee will cause hits on a 6 or more with the better quality, but fewer figured units rolling D10's per figure to hit, the regulars getting D8's and the cannon fodder on straight D6's. Saving throws are similarly structured and the leaders were generally fighting with a D12.


To make things interesting, we had some boxes of contraband and booty in the camp, next to the tent in the centre of the table which we all would have been happy to keep with fewer people to share with, thus an alliance of convenience rather than one of goodwill.

The four roads leading into our camp area were the approach routes of the separate but cooperating Colonial troop columns similarly structured with differing ability units but with much different weaponry, some including heavy machine-gun teams.

In preparation for the arrival of the regular troops we set up some road barricades and positioned some troops outside of the camp perimeter. I chose to put my four man mercenary section on the road barricade to slow the approach of the British-Indian army column, whilst my men manoeuvred for a better position to attack from.

Will making some last minute adjustments to his slave traders set up prior to the arrival of the German column on his road
My four man mercenary team cover the road barricade with the pirate riflemen lining the hedgerow behind
Will's Arab slave trader riflemen together with a light cannon cover the road barricade on the route of the British Naval brigade
Once the perimeter forces were set up the four colonial troop columns edged their way down their respective roads.

The movement and combat is card driven so no Igo-Ugo here and the anticipation and often frustration experienced just willing the right card to come out at the right time just added to the fun of the game.

View of the camp perimeter with the River Pirates nearest camera and their allied band of native club-men centre, by the tent
My best unit and one of the more successful units to still be standing at the game end was my eight man squad of pirate riflemen who regularly fired off five D8's worth of shots at various targets through the game and succeeded in taking out the Indian HMG team and shooting up both British rifle squads as they approached the camp aided by the club-men skulking about in the undergrowth and charging out at the survivors from the shooting, taking out the British commander in one attack.

British -Indian army patrols covered by Vickers HMG placed on the road
German Askaris covered by an HMG team as they approach the camp
All the Colonial Troop columns were badly shot up at game end but the Royal Navy more through luck, I suspect, than planning had managed to keep their Naval squad away from the worst of the carnage. Their card had failed to show up for several moves during which time the two sides had dealt mortal blows to each other.

As the Jack Tars moved  into the camp the Pirate leader could only shout defiance as he leapt over the hedge to join his men as they retreated leaving their ill-gotten gains behind them.

The British Naval brigade column, with Jolly Jack Tars top left
My Pirate Mercenary squad try to ambush the Indian HMG team but whilst getting badly shot up only kill one of the enemy 
Arab slave traders and Azande tribesmen man the perimeter
The River Pirates with their ranks thinned in the fighting pull back observed by Captain "Bunny" Chivers MC, Royal Engineers (centre top), last man standing in the British column and carrying his trusty croquet mallet that he used to dispatch several of my men!
The rules played seamlessly and we were soon able to roll our dice with the basic mechanisms memorised, and I really appreciate rules that work in that way. It is clear that "Donnybrook" have plenty of scope in them to allow you to tailor them as required and I really liked the way they played.

We were using characters like my witch doctor who had the ability to terrorise the enemy on first meeting him thus reducing their to hit potential as they were temporarily memorised by his carrying on.

The Royal Navy in force move into the camp ready to seize the contraband
The German Askari HMG team cover the camp perimeter whilst the British Naval infantry move in to mop up
Personally, I am on the lookout for a turn too skirmish set of rules, mainly for horse and musket eras, and these are now firmly in the frame, possibly alongside Sharp Practice by the Lardies as another option.

Not much left of the Congolese Republic troops as they go through the roll call for the third time
We all had a great day messing about in the Congo jungle with lots of laughs and chat which just made the game play even better. If you haven't played Donnybrook, I would certainly recommend giving them a go.

We played from about 10.30 am to about 15.00 with a stop for lunch with, as you can see, plenty of figures on the table and got a clear result in the time, so these should make a very usable set for smaller games with less time to get a result, very useful for those of us who are often time poor and need a quick game system.

The rulebook is in full colour and like the "Republic to Empire" rules from Barry Hilton that I have are full of "eye candy" alongside a well structured layout.

A deserted camp at the end of the days fighting. The River Pirate Chief is the last man to leave defiantly overseeing his surviving pirates away down the road to regroup and fight another day
The River Pirate Chief shouts defiance (top centre behind the native hut) as the Royal Navy move in from the right
Thanks to our host Chas, and to Nick, Mike, Steve, Vince, and Will for a great day of wargaming.

Alfred the Great - The Great Heathen Army 871 AD, "Wash Up" and Post Game Comments


Just to conclude the series of posts on our play-through of "Alfred the Great - The Great Heathen Army 871 AD" by Mark H. Sheppard, Steve and I decided to write up our thoughts about our strategy and what we might have done differently now we have the experience of of first game.

As Steve was the victor I think it only fair to let him have the first say, followed by my own thoughts as the humbled loser.


Mr Steve's Thoughts:
So the world is once again free from the tyranny of the West Saxons, however sitting here now with my feet up on a pile of Saxon skulls I am thinking that things could have gone a little differently.

Sometimes I think the most enjoyable games are those played when neither side has any idea about what they are doing as it only takes roughly four or five games of any boardgame before the set moves and optimal strategies kick in and then all future games tend to follow a similar course of events. I certainly had no idea what I was doing and it is therefore possible that I may have made some less brilliant moves than normal so lets review our game .

I think there are three main points I want to look at and after going over each one in turn I will chip in at the end with some minor ones as the thoughts come to mind.

Towns.
The key to this game is occupying towns, to do so as the Vikings you will have to capture them from the Saxons and there are two ways to do this, Assault or by Siege.
Both Jon and I had unpleasant experiences early on whilst assaulting towns and this made us very wary of repeating it but my attitude changed after closer study of the rules. Assaulting towns isn't that hard if you pick your targets and look at the odds, Religious Towns can be breached with a 50% chance and Royal towns on 33%, once inside you will then normally overwhelm the defenders. Without a king the defenders chance of hitting you back in both cases is also only 33% and if you are attacking small garrisons of 5 to 10 then you can usually survive two or three turns of being hit before considering giving up. Sieges take time, a long time and not only that but your individual hexes are open to be attacked whilst doing so. Jon’s assault on London whilst probably worth an attempt was always going to be difficult as he had to throw a 6 to breach the wall of a Castle which is the strongest type of defended area in the game plus he was a little unlucky in that all three of the defensive rolls were hits whilst he was trying to get in.

Supply
Linked to the above, as the Vikings you should spend your time while waiting for the Summer army to arrive by occupying as many easy supply points as possible, this will both deny the Saxons extra troops and will boost your starter army. This was something I singly failed to do and I should have spent most of my early turns moving along the Thames occupying the many supply points that are located in that area.

Battles.
We didn’t have any, not through want of trying on my part, which I suppose reflects to some extent the inherent fear of the “One Big Battle” complex, fine if you win but devastating if you lose, you can see why many Kings /Generals avoided fighting battles unless they had a really big advantage over the enemy, had no choice or were bonkers.

Odds and ends.

River Thames
The river is key for the Vikings, you get free movement along it and after enjoying a pleasant boat trip you still get to move off into the countryside with any of your remaining movement points, when I cottoned onto this I started to dangle out many little single “worms” who by occupying supply points might just get Jon to bite and attack them, meanwhile my army, seemingly well out of range was cunningly poised to sweep down the river and gobble them up if I got a nibble. Unfortunately Jon was too dense to fall into my trap; I will have to be less devious next time.  

Aethelred 
Jon’s original plan was to get Aethelred killed off in order that the much more powerful King Alfred could take over, knowing this I decided that I wouldn’t oblige and deliberately tried to keep him alive. My thoughts on this have changed and if the opportunity now cropped up to do painful things with pointy sticks to him then I would definitely do so. The advantage of having two Kings available as opposed to just one is huge, as far as the actual casualty’s the two Kings themselves cause then the combined total is roughly the same as those caused by one Super Alfred however what they really do is to greatly boost the chances of your warriors and earls hitting in combat, with a king its 66%, without its only 33%. As a Saxon I would try and keep both leaders alive for as long as possible so that I could campaign in two armies rather than just one. I believe Jon has also reached this opinion as well having recently read a reply of his to the game designer, Mark Sheppard.

Could the Saxons have done things differently?

I spent more time reacting to the Saxons rather than scheming for them so it’s a bit tricky for me to say and obviously I was not aware of what their master plan was, if there was one. Jon maximised his supply points very well and therefore increased the size of his army greater than it should have been however I might have considered risking an early battle in order to degrade the Vikings options even at the risk of losing Aethelred. Towards the end when the Great army was sat in front of Basing I think Jon’s decision not to attack was correct as a defeat would have been devastating and it wasn’t as if the enemy could actually threaten anywhere. (My plan was to pin the main Saxon army in place out of the way and that is what happened).
The one thing I would definitely have done differently was at the end when the real threat was Guthram, I would have attacked him with Alfred’s army mustering up everything I could find because Guthram's force was positioned to threaten so many places that couldn’t otherwise be adequately defended and especially as it was the last turn with the Viking’s getting a free go at any points in range. Then use some of the Earls in the Basing army to occupy the empty towns as, given average luck, there wouldn’t have been many surviving Vikings from that army to take advantage of weak garrisons.

What other general tactic do I see for  the Saxons to follow in the game; they need to restrict the Vikings rampaging about and also to try and recapture any fallen towns whilst still maintaining the highest possible supply score however it is tricky to chase someone down who can just jump on a boat and sail away, perhaps Royal towns along the river could limit movement if still held by the enemy but there are many recorded occasions when the Viking longboats coasted past defended burghs and it was only places with bridges that could really stop them so perhaps not.  

Conclusion.
This was a fun game to play and I had forgotten how enjoyable it was waiting for your opponents turn to appear in your inbox. I would imagine that this could easily be played in an evening in around an hour across a table with a few tankards of mead.


Oh yes, don’t abandon Reading at the start like I did and instead make the Saxons fight for it , by adding in a spare King not only are you more likely to inflict casualties more often but it will also attract them like moths to a flame . 


JJ's Thoughts:
Wow! I think Steve has pretty well covered all the areas I was thinking about when I got his thoughts through on the email and then decided that it was so flipping good, what can I add?

So I might as well keep my comments succinct and use them to highlight and emphasise the points Steve has so eloquently covered.

The Villages, Religious sites, Royal Estates and Castles are the key to gaining the advantage in this game as they impact on victory conditions and supply, which are the two factors that will decide if you will win and by how much. The occupation and control, particularly of the defensible "fortified hexes" which are all of the habitations except villages, offers the defender a force multiplier by adding in the potential to inflict casualties on any unlucky sole who fails to breach their defences. In addition their control generates the points that pays for all those troops you will need to replace your losses and to add to your numbers.

I totally agree with Steve's comment about the fun of learning the game as you play and the potential generated from mistakes that more experienced players probably wouldn't make. Thus my taking of Readingum early in the game when Steve vacated it was all part of an early cunning plan to take advantage of his vacating the town and follow that up by grabbing Lundene and shutting down the river to Viking landings and movement. It was a bit risky attacking Lundene with its high defence but if you are going to try, better to try early in the game when you have time to recover any losses incurred with all those Saxon supply turns coming up.

The attack on Lundene didn't come off and I incurred higher than average casualties in the attempt that forced me onto the defensive whilst I rebuilt my forces. Steve wisely recognised the importance of  building his own force during my inactivity which again left me little time to do much about the situation before the Great Summer Army turned up.

I think the forward defence on the river was probably the right strategy, because it forced the Vikings to clear their rear areas before advancing inland, but I made the cardinal error of not putting the King or Alfred into Readingum thus causing them to miss out on really hurting the Vikings when they inevitably broke in over the walls.

I agree entirely that losing Aethelred, particularly whilst the Vikings are still a force to be reckoned with, is a poor swap for getting Alfred the White instead of Alfred the Grey. The benefit of having two leaders able to hype up the combat effectiveness of the troops is really important particularly when the Vikings have five such characters running around the map.

The big battle temptation was close to being taken, and I did seriously think of stripping out all my Earls and King Aethelred from the garrisons to join Alfred in one last hurrah attack on Guthrum at the end. The risk in going for the big battle is that with much riding on the result for me as the Saxons, the Vikings had the luxury of fighting the first round and if there was no advantage to them, retreating back to their stronghold on the Temes or trying to take out the two Saxon Royals for a knock out major victory. Either way, their main force was sitting pretty in Readingum waiting to mop up at the end.

Perhaps the Aethelred of the Sagas might have risked it all on one last throw of the dice, but I think, on reflection that discretion was the better part of valour limiting the overall victory as it did, although I am kicking myself for not putting a forlorn hope force of warriors out on the road to Wilton to stop that final raid.

My final thought, and the one which prompted me to get the game is that I am confirmed in my thinking that herein lies a great little map game to generate tabletop encounters with figures, be they big set piece battles or assaults on walled fortifications and the fights in the towns when the walls are breached. The forces involved would be easily assembled with a few boxes of plastic figures and the game would add that, oh so important, context to the tabletop clash.

I agree that there is much fun to be had from this game and I am looking forward to resuming the struggle over Cyberboard in the next in the series "Alfred the Great - The War in the West Country 876 AD".

If you missed the earlier posts on our play-through, just click on the label "Alfred the Great" at the bottom of this post or in the "Labels" section in the side bar to the right to follow the game.

Lots more fun to come on JJ's with next up our annual Xmas-New Year game in North Devon with Chas, then we're back at Talavaera as Will leads the German Division against Steve M holding the Pajar Vergaga Redoubt and a review of 2015 and New Year Plans.

Sunday 27 December 2015

2/45e Regiment de Ligne


The 45e Regiment de Ligne was already a veteran French regiment when it entered Spain for the first time in 1808, with battle honours that included Austerlitz and Friedland and experienced soldiers in its ranks from the 1805/06 and 1807 campaigns in northern Europe.


In January 1808 the regiment contributed a battalion to the 9th Provisional Line Regiment as part of Marshal Moncey's, French Corps d'observation des Cotes de l'Ocean. The corps was tasked with following in the wake of General Dupont's 2nd Corps d'Observation de la Gironde as they entered the Biscay Navarre region of north east Spain, as the former headed towards Vallodolid and Burgos

French Corps d'observation des Cotes de l'Ocean
l January l808
3rd Division: General de division Morlot
lst Brigade: General de brigade Lefebvre
9th Provisional Line Regiment
8th Line Infantry Regiment (l)(6/299)
22nd Line Infantry Regiment (l)(2/ll5)
45th Line Infantry Regiment (l)(6/299)
l05th Line Infantry Regiment (l)(8/556)

The map illustrates the movement of the first of Napoleons troops to enter Spain in January 1808
The progress of Moncey's Corps was covered in my post about the 2/54e Ligne who like the 45e Ligne ended up garrisoning the capital Madrid through the turbulent days before and after Dos de Mayo uprising and Dupont's defeat at Bailen.

http://jjwargames.blogspot.co.uk/2015/10/254e-regiment-de-ligne.html

The first invasion activities that involved or were associated with the movements of the 45e Ligne can be summarised from the map above:
1. Moncey's Corps are sent in to relieve Dupont's troops in the Navarre and Biscay towns.
2. Joachim Murat arrives in Burgos collecting both Dupont's and Moncey's troops to march on Madrid, arriving in the capital on the 23rd  March.
3. Towards the end of May, Murat became ill and handing over command to General Savary headed back to France to convalesce, not before sending back several reports to the Emperor playing down the level of the national uprising and describing the situation as localised riots. Napoleon issued new orders which focused on maintaining a strong hold on the LOC from Madrid via Burgos back into France with the two corps in and around Madrid providing troops to march on Valencia, with Moncey detaching 6,000 men of  Musnier's 1st Infantry Division and Wathier's Hussar brigade to capture the city;
4. and for the subjugation of Andalusia, Dupont taking Barbou's infantry division and Fresia's cavalry division, marching on Seville and Cadiz.

With the failure to overawe the Spanish and their defeat at Bailen destroying the myth of French invincibility, Napoleon soon realised that the invasion required his personal attention together with a lot more troops


The three battalions of the 45e Ligne found themselves alongside the 54e Ligne as part of General de Brigade Darricau's brigade in the 2nd Division of Marshal Victor's I Corps as part of Napoleon's Grand Armee organised in November 1808 for the second invasion of Spain. The movements of the corps have been covered in the other posts on the four regiments preceding this one and can be picked up in the link above to my post on the 54e Ligne.

French Army in Spain, 15 November 1808 - Source Oman
I Corps: Maréchal Victor

2nd Division: Général de division Lapisse

Brigade: Général de brigade Maison
16th Légère Regiment (3)(47/1,739)
8th Line Regiment (3)(52/1,922)

Brigade: Général de brigade Darricau
45th Line Regiment (3)(52/1,703)
54th Line Regiment (3)(59/2003)

Artillery:
7/1st Foot Artillery
2/8th Foot Artillery
8th Artillery Artisan Company
(Battalions)(Officers)(Men)

General de Brigade Augustin  Darricau
https://fr.wikipedia.org/wiki/Augustin_Darricau

One particular period of interest that I haven't really covered in my previous posts in this series was General Lapisse's 2nd Division's time in Salamanca and its battles with Sir Robert Wilson's Loyal Lusitanian Legion which culminated with their fight for the bridge at Alcantara on the 14th of May 1809.

January - March 1809
The base of operation in Leon for the Loyal Lusitanina Legion and Lapisse's 2nd Division
General Lapisse's division spent the early months of 1809 detached from the rest of I Corps on garrison duty in Salamanca and the outlying towns in Leon; and their patrols into the surrounding area around the city brought them into contact with the Anglo Portuguese light infantry unit on raiding trips designed to take the war to French forces and keep them uncertain as to allied strength along the Portuguese/Spanish border and to monitor their activities.

This little war of the outposts went on from January 1809 to the March with the the Legion, operating from its base at Almeida, patrolling into the region of Leon and regularly "bumping" similar patrols from the French division.


This period of time was also one of great peril for the Allied cause in Portugal with the defeat of Spanish armies during Napoleon's invasion, the withdrawal of General Moore's British army from Corunna in early January and the remaining British troops pulled back by General Craddock in and around Lisbon, seemingly in preparation for a British withdrawal.

The allies feared that Lapisse's 2nd Division would spearhead the reoccupation of Lisbon and the aggressive activities of Wilson's Legion of Portuguese volunteers led by British officers, clad in British style uniforms did much to confuse the French as to the strength and capabilities of what seemed was potentially a 12,000 man Anglo Portuguese Corps forcibly asserting its presence on the border with Portugal and the plains of Leon and northern Estremadura.

In fact the Legion barely numbered 300 men supported by Portuguese militia, newly forming and encouraged bands of Spanish guerillas and the 1,400 man Spanish garrison at Cuidad Rodrigo.

Loyal Lusitanian Legion troops in a raiding action against French troops during the early months of 1809, little skirmishes that would have involved the men of the 45e Ligne - Picture by Mark Stacey
During the time of Lapisse's 2nd Divisions detachment, Marshal Victor dealt with the threat to Madrid from Venegas' 11,000 man Vanguard division of Infatado's Army of the Centre at Ucles on the 13th January 1809 and followed this up with his pursuit of and beating of Cuesta's Army of Estremadura at Medellin on the 28th March 1809, both covered in a bit more detail on my post about the 2/96e Ligne.

http://jjwargames.blogspot.co.uk/2015/07/296e-regiment-de-ligne.html

With the advance of Marshal Soults Corps into Northern Portugal, Victor came under pressure from King Joseph to fulfil his part of the Emperor's plan by supporting the invasion with one of his own along the valley of the River Tagus. Marshall Victor, following the battle of Medellin was not, in his opinion, strong enough to either pursue Cuesta's beaten but reforming army now based at Badajoz or ignore the Spanish threat and move towards Portugal. In addition he was struggling to feed his troops in and around the town of Merida, with few supplies coming to him from Madrid.

In late April 1809 the situation changed dramatically with the arrival of Wellesley and British reinforcements at Lisbon. The new commander reinvigorated the Anglo-Portuguese offensive spirit and Wilson's growing band of Legionaries put more pressure on the French, with more raids and interference of their communications between Salamanca and Merida now supported by General Mackenzie's covering force of 12,000 Anglo-Portuguese troops at Castello Branco in eastern Portugal.


With the new threat in Portugal Marshal Victor was authorised by Joseph to issue orders to Lapisse to bring his division south and reunite it with the rest of I Corps at Merida. This was not as simple as it sounded as it was Wilson's Legion that threatened that plan due to their blocking of the passes over the mountains north of the Tagus.

General Lapisse thus cleverly led his 7,000 man division plus the 1,500 dragoons from Latour Maubourg's division, towards Cuidad Rodrigo in what looked like a threat to the Spanish garrison when he arrived before the city issuing a summons for its surrender on the 6th April. As expected the summons received a brusque response from the garrison well aware that Lapisse had no siege artillery with him. However the move had achieved its object by getting the attention of Wilson and causing the Legion to muster close to the city to aid in its defence.

The French division moved away to the south by night and hurriedly marched on the Tagus crossing at Alcantara, and catching Wilson's men by surprise and brushing aside the Spanish levies encountered along the way.

The Roman bridge at Alcantara was taken by assault by Lapise's men against a weak barricade manned by Spanish militia, they then went on into the town after the walls were subjected to a cannonade and according to Lieuntenant Colonel Mayne of the 1st LLL, and Captain Lillie of the Legions cavalry regiment in pursuit of the French division,

"the revenge and cruelty of the enemy were exercised in the most barbarous manner on the unfortunate and helpless inhabitants who had been found in the town, or taken in endeavouring to make their escape. They were butchered in the most brutal manner in every direction and it may be doubted whether the annals of history describe so inhuman a spectacle as that unfortunate place presented on its evacuation by its treacherous and cruel enemy, who performed acts of cruelty and barbarity there that would disgrace the most savage and uncivilised of mankind." 

April 1809 - Lapisse leads the 2nd Division to Merida, sacking Alcantara on the way
On the morning of the 13th April, the French 16th Legere, 8th, 45th and 54th Ligne regiments were observed leaving the town with all the loot they could carry via the road to Caceres by the men of the Legion who pressed on the outskirts of Alcantara to determine if the French would contest its occupation and make a stand.

On entering the town the two British officers noted the scenes that greeted them,

"The scenes witnessed ........ exceeds all description; the houses in many parts of this unfortunate place were in flames, and the passage of the streets actually obstructed by mangled bodies of all description lying in heaps; in other places, piles of furniture, and many valuable articles that could not be brought away had been erected in front of houses of some of the principal inhabitants, and been set fire to, and the mutilated bodies of the unfortunate owners covered with wounds, were thrown on the piles, and there found burning in the most shocking manner....."

General Lapisse and his men continued their march south rendezvousing with Victor at Merida on the 19th April.


May 1809- Victor takes 2nd Division to retake the bridge at Alcantara
As Lapisse's men were leaving a trail of murder and destruction in their wake, the Anglo-Portuguese command was alive with orders to support the new offensively minded approach to dealing with the French in or threatening to enter Portugal.

As Sir Arthur Wellesley set off north from Lisbon to deal with Soult's army paralysed in Oporto due to militia and guerrilla attacks on his rear areas, orders were issued for General Mackenzie to defend and delay any moves by Marshal Victor's corps whilst Soult was being dealt with.

In accordance with his orders he was to support the deployment of the 1st Battalion Loyal Lusitanian Legion (750 men) now under the command of Colonel Mayne after Sir Robert Wilson was ordered to join Welesley's staff, bringing with him his much needed local knowledge; together with a troop (50 men) of the 11th Portuguese cavalry, the legion's artillery of four 4 pounder guns and two 5.5 inch howitzers and 1,200 men of the Portuguese Idanha Militia Regiment. Their mission was to set up their force to best defend and hold the bridge at Alcantara, considered a vital crossing point should Victor decide to advance into Portugal.


The build up of this force was soon noticed by Victor as General Lapisse reported back on his men's contacts with the green coated troops they had fought in Leon, now operating in the countryside between Alcantara and Merida. The Marshal was starting to feel the pressure of having a resurgent Spanish army under Cuesta to his west at Badajoz and what looked like an Anglo Portuguese corps threatening him from the north, not to mention his concern to be seen by the Emperor to be actively supporting operations against Portugal.

The previous months operations by the Legion had also served to encourage large scale resistance from the guerrilla bands in Leon who had now severed all contact to Marshals Ney and Soult further north.

Thus, feeling sure that Alcantara could not be left in allied control, on the 11th May Victor led Lapisse's 2nd Division, together with the 5th and 12th Dragoons and a dozen artillery pieces (about 10,000 men) towards the town leaving the balance of his corps to observe and contain the Spanish at Badajoz.

Arriving at about 08.00 on the 14th May, skirmishing with the Legion along the way, the French entered the town as the legionaries fell back through it to the prepared defences on the bridge itself. As the bridge came into view of the French they found Colonel Mayne's force dug in on the opposite bank with his light guns deployed determined to dispute the crossing.

The Grenadier Companies of the 8th, 45th and 54th charge into the withering fire on the Alcantara bridge - 14th May 1809, Picture by Mark Stacey
Victor and Lapisse soon realised that, with no opportunity to turn the position and with a determined enemy set on holding one end of the bridge, storming it would be the only solution. At 09.00 a nine hour battle for possession of the bridge commenced with the assault columns of the grenadiers from the 8th, 45th and 54th Ligne formed up and under the cover of the massed French artillery and infantry skirmish fire from their side of the river. What followed was a series of assaults with the French columns making multiple attempts to force their way across the bridge in the the teeth of withering fire from the defenders.

At about noon the Idanha Militia Regiment had had enough and the men deserted the trenches leaving Mayne and his men little option but to prepare to fire an explosive charge laid under one of the main spans. This was done at about 13.00 and the charge exploded but Roman engineering showed its quality as the charge only succeeded in blowing out half of the span leaving a narrow stretch still usable by infantry and cavalry.

The last of the Legion's 4 pounder guns were fired at 15.00 after which they were spiked. At about 17.00 and with ammunition running low and French pressure continuing, a rear guard was appointed and the defenders began to pull back, with the battle petering out by 18.00 and with French troops on the opposite bank, with cavalry patrols seeking out the Legion rear guard along the road into Portugal at Segura.

The casualties reported by the French in the nine hour fight are unknown but Mayne and his officers estimated their losses at around 1,400 men. The Allied force reported casualties for the Legion to be 4 officers and 103 other ranks killed, 4 officers and 143 wounded and 2 subalterns and 15 other ranks missing; and for the militia, 3 officers and 40 other ranks killed, 1 officer and 17 other ranks wounded and 2 subalterns and 1,150 other ranks missing.

With the bridge now firmly in his hands, Victor could at least feel secure that the road to Madrid was under his control. This however did not relieve his uncertainty as to his overall position with Cuesta's army at Badajoz growing by the day as more recruits joined the colours and with a seemingly large Anglo Portuguese force facing him along the road into Portugal at Castello Branco.

In the days following the battle Victor received news of Soult's defeat at Oporto and on the 17th May he evacuated Alcantara, falling back to Merida and pursued by Cuesta and eventually Wellesley, began the march back into Spain that would culminate in his army's arrival at Talavera further along the River Tagus in July.


Thus the battle honours credited to the 45e Regiment de Ligne for 1809 would include
1805: Austerlitz
1806: Crewitz and Lubeck
1807: Ostrelenka and Friedland
1808; Espinosa-de-los-Monteros
1809: Alcantara, Aspern-Essling, Wagram, Talavera-de-la-Reina and Almonacid

My 2/45e Ligne are composed of figures from AB with the battalion fanion from GMB Flags.

Other sources used in this post:
Raid, Oldest Allies, Alcantara 1809, Osprey - Rene Chartrand, Mark Stacey and Johnny Shumate