Tuesday 30 May 2017

The Queen's Sconce, Newark


The Queen's Sconce is an English Civil War Star Fort constructed in 1644 as part of the Royalist defence works surrounding the town of Newark.

As part of our weekend away at Wargames Foundry and Partizan a group of us decided to head out from Lincoln on Sunday morning to visit the sconce before heading off to the show.


Sconce and Devon Park

The Sunday was a perfect day to head down to the suitably named Devon Park, named after the River Devon that flows close by rather than our home county, as the torrential rain on Saturday had given way to sunshine.

The town of Newark was strategically important for its position astride the crossroads of the Great North Road and the Fosse Way that ran north-south and east-west through the English countryside and was also a key local centre for bread making and the production of gunpowder.

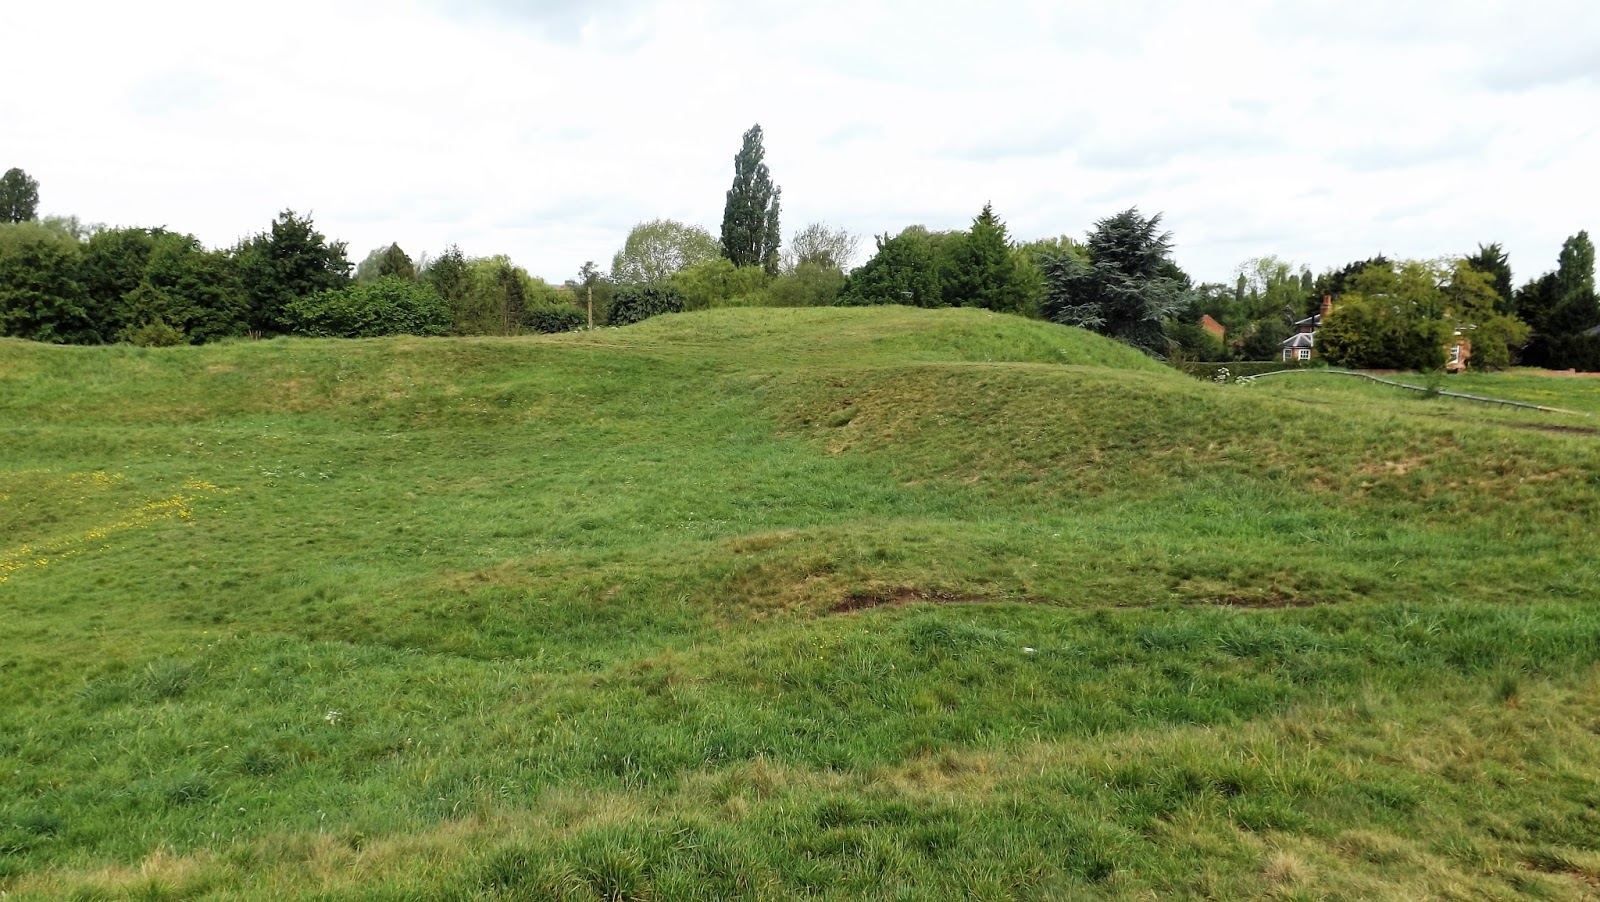
The importance of the town is certainly reflected in the scale of this defence work which catches the eye immediately on entering the park


Named after Queen Henrietta, the sconce was built on high ground south of the town perfectly situated to cover the approaches via the Fosse Way over the crossing of the River Devon and also preventing the ground to be used by attacking Parliamentary forces intent on bombarding the town.

The map shows the layout of the defences surrounding Newark with the Queen's Sconce on the south side and the intersecting roads passing through the town.


The earth ramparts and ditch still present a formidable obstacle despite their gradual erosion over the intervening centuries and are easily visualised steeper and deeper with projecting wooden stakes designed to impede any attempt at assault.


Perfectly designed to soak up or deflect round shot whilst providing vantage points for internal artillery and musket fire able to enfilade any attacking infantry the whole earthwork covers an area of slightly more than three acres with a thirty foot wide ditch up to fifteen feet deep.

The interior of the sconce viewed from the eastern rampart
Constructed from local river gravel and probably strengthened with timber posts, the sconce has an internal area about three-hundred feet across and would possibly have protected internal buildings to house the garrison, anywhere between twenty to one hundred and fifty men as circumstances dictated, and magazines for the ammunition needed to supply the four to five cannon positioned one in each arrow head bastion, with an extra gun positioned to cover the southern approaches.

View from the eastern rampart looking towards the northern bastion
Besieged on three occasions, it was the second attempt that revealed weaknesses in the town's defences leading to the construction of the King's and Queen's Sconces (see the map above of the towns defences).

The eastern bastion with the spire of the church in Newark visible on the centre right horizon 

This view from the top of the rampart gives a good impression of how steep the sides are and were back in 1644
The map used above positioned in the eastern bastion proved a useful reference check as to how the sconce fitted in to the town defences
The defences may have been bolstered after the second siege but Parliamentary determination to take it still persisted leading to the third and final siege in November 1646 when a combined Parliamentary and Scots army of about 16,000 men arrived before the town after reducing the Royalist strongholds in the surrounding countryside.

The northern ditch facing towards the town
The Royalists with less than 2,000 men ran a spirited defence, launching raids on the besiegers through the winter of 1645-46, but into the spring the Parliamentary forces damned local rivers to stop the flour mills production and with that and the complete encirclement of the town gradually reduced the garrison and townsfolk to starvation rations with the forced drawing of water from town wells.

The western ditch from the top of the ramparts possibly where the timber drawbridge allowed access
As the stranglehold tightened the misery only increased with the outbreak of plague and the storming of the town looked imminent. It was then that Charles, forced to flee from Oxford by the approaching New Model Army, entered the Scottish camp on 5th May 1646 to surrender to them rather than Parliament, in a last ditch attempt to divide and conquer his enemies.

The interior area would have originally housed the garrison quarters and magazine
The Scots however were having none of the King's scheming and demanded that he order the immediate surrender of the town which he did and Newark surrendered the following day.

The surrender of Newark is seen as the effective end of the First Civil War.

The southern rampart and ditch here and below face out towards the southern approaches and the Fosse Way crossing of the River Devon


As with most Royalist supporting strongholds that caused Parliament the most problems their defences were very often ordered destroyed so as to prevent any further problems thereafter, and Newark was not exempt with the defences of the town ordered to be destroyed.


However we have the plague to thank for the survival of the Queen's Sconce as, with the Scottish army keen to head back north with their Royal captive and the Parliamentary troops keen to be away from the source of the outbreak, it was the few villagers and townsfolk who were left that had to carry out the dismantling of the defences.

Much reduced themselves in numbers by the losses suffered during the siege and by the subsequent plague there were very few people around to carry out the orders and we have been left the finest example of English Civil War fortifications to survive in the country.

The plaque reads - The Royalist Cannon by Michael Condron commemorating Newark's role in the Civil War 2012 AD 
I have never seen anything quite like the Queen's sconce, and it is a truly impressive piece of military engineering with a fascinating history and the visit really added to our weekend away.

Sources consulted for this post:

Sunday 28 May 2017

Talavera 208 - Bassecourt's Spanish 5th Division & General Cuesta


The Spanish 5th Infantry Division of the Army of Estremadura was probably the best of the infantry in the army with its four regular infantry battalions, two marine battalions and a battalion of provincial militia.

The quality of the Spanish units earned the division the title of the Reserve Division and it would play an important role in the upcoming French final attack helping to prevent any serious attempt to turn the Allied left flank in the northern valley.

Major General Luis Alejandro Bassecourt
5th Division: Major-General Bassecourt
1st Real Marina (Royal Marines), 1st Battalion
1st Real Marina (Royal Marines), 2nd Battalion
Africa Infantry Regiment, 3rd Battalion
Reina Infantry Regiment 1st Battalion
Murcia Infantry Regiment, 2nd Battalion
Murcia Infantry Regiment, 3rd Battalion
Provincial de Siguenza (Militia)

The completion of the Spanish 5th Infantry Division together with General Cuesta moves the Talavera 208 project into its penultimate stage of completion as this is the last formation that was needed to be completed to model all the units that featured that hot afternoon on the 28th July 1809.

Generals Cuesta and Bassecourt on parade with the 5th Infantry Division of the Army of Estremadura
The map below illustrates the complete line of battle taking in the Spanish troops occupying Talavera itself, however the table will focus on just those units involved in the fighting which concentrates the table on the left and centre of the whole allied line.


The maps that will guide the tabletop commanders have now been edited to indicate the positions of all the formations involved in this part of the battlefield together with the key victory point areas that are masked here to keep the opposing commanders 'in the dark' as to their value to each side.

Allied Set Up

The first game is arranged to be played at the end of June and together with the new maps the players have had their briefings to allow some pre-game preparations before the big day.

French set up
As with other formation parade posts, I have linked above all the individual units that were completed as part of the 5th Division to this page for future reference, should others choose to use my research as a basis for their own collections.

Major General Bassecourt with an aide from the Reina Regiment
General Bassecourt and his aide from the senior Reina Regiment are AB figures.

The Spanish command system together with the quality of their troops and generals makes them a fascinating command challenge for most sets of Napoleonic rules and no less using Carnage & Glory.

General Bassecourt is a divisional general only because the Spanish did not use an official brigade structure. Thus Bassecourt's stand is as a French of British brigade commander, but I add a single foot aide to indicate the rather hybrid nature of the Spanish system.

1st and 2nd Battalions Real Marina (Royal Marines)
The composition of the division, having mainly regular battalions makes its appearance quite different from the 3rd Spanish Division on the right flank of the British line and featured in previous posts.

3rd Africa and 1st Reina Regiments

2nd and 3rd Battalion Murcia Regiment
I have really enjoyed researching and constructing the Spanish for this action and feel they add a great deal of colour and individuality to any Peninsular War table.

Provincial de Siguenza Regiment
General Gregorio-Garcia de la Cuesta
https://en.wikipedia.org/wiki/Gregorio_García_de_la_Cuesta

My General Cuesta command group is based on the excellent illustration by Graham Turner in the Osprey Campaign 'Talavera 1809', showing the General meeting with Sir Arthur Wellesley during the pre-battle manoeuvres.


I know that Cuesta is reported to have been wheeled around the battlefield on a mule drawn carriage but I have chosen to keep my senior Spanish commander on horse back to allow his inclusion in future Spanish actions as another of his colleagues when the need arises.


The generic approach to modelling Cuesta means that I have given him a Cazadore a Caballo, ADC officer together with a volunteer lancer escort to complete the look.


Thanks to the copious amount of coverage the Spanish general gets in British accounts of the campaign Cuesta appears to be a rather awkward obstinate and proud chap for the much younger Sir Arthur Wellesley to deal with.

In fact the only reason that the two allied armies ended up fighting a defensive battle in the first place was down to a fit of abject obstinacy only a few days prior to the battle when Cuesta refused to attack with the British on the day agreed because he felt his troops were  too tired.

The Spanish general then pursued Victor's I Corps towards Toledo only to beat a hasty retreat back to Talavera and Wellesley's army, pursued by Victor, Sebastiani and King Joseph's Madrid Reserve.


Of course Cuesta's behaviour can be partly explained by the manoeuvring going on among the higher echelons of the Spanish General officers and the Supreme Junta as characters vied with each other for supreme command of Spanish forces. Cuesta was in the running for this command and his suspicion and dislike of Wellesley could only have been piqued when he heard a rumour that the British General was being put forward as a potential Allied Supreme Commander.

Interestingly Cuesta's finest hour at Talavera was probably in between the hours of 12.00 to 13.30 just prior to the afternoon French attack when he agreed to Wellesley's request for Spanish support in the northern valley, surprising the British general by not only sending the Spanish Reserve Infantry Division under Bassecourt but also the 2nd Cavalry Division under Albuqueque together with seven Spanish guns, including three 12lbrs.

Thursday 25 May 2017

Wargames Foundry - Devon Wargames Group Day


Last weekend the Devon Wargames Group and friends, Panjo and Andy, went on tour with a trip up to Nottinghamshire to take in the delights of Wargames Foundry on the Saturday and Partizan on Sunday interspersed with a bit of merriment and battlefield sight seeing.

Lots of eye-candy at Patizan last weekend in the link below
Partizan 2017

The trip up to Foundry based in Newark took just under four hours, so setting out at about 07.00 we were up to their show-room/shop/games-room for about 11.00 in time to get started on our game before lunch, provided by our hosts mixed in with a bit of occasional retail therapy.

When Tom, Vince, Steve M and I arrived the other guys were already there, so once the table was set up and the respective forces laid out, Mr Steve M our Gamemeister for the day briefed the players on their objectives.

The cat herding begins
Our game was a French Indian War 'big bash' using Muskets & Tomahawks, with Steve overseeing the card deck to herd the cats that playing a big game in our club can sometimes feel like, especially with the added distraction of all those lovely Foundry figures in close proximity just asking to be given a new home.


We were looked after during the day by Diane Ansell and her team who kept our strengths up with liberal lashings of tea and coffee together with other sustenance as well as dealing with our purchases.

French Coureur de Bois lead the advance across the river
British Rangers move forward to contest the French advance
The premise of our game was a fairly straight forward encounter mission between the two opposing armies with each player commanding a different mix of three or four units of Indians, Regulars, Militia and Ranger/Coureur de Bois types but with each player also having an individual task to perform during the play.

This mechanism meant that as well as dealing with the threat posed by the enemy opposite each player had an eye on an objective close by that had to be kept in mind as the forces tried to grab control of various parts of the table.

My motley force are led across the river by a screen of Indians
The early moves were a rush to get forward and grab the terrain
As an example I ended up commanding a group of ten Militia, eight locally raised Irregulars and eight Indians, with the task of securing a wagon in the opposite half of the table and dragging it back into French lines.

British Regulars and Colonial Militia could chuck out the fire
Tom's regulars and light infantry on the advance
My particular task was made extremely difficult as the open space between my occupied barn opposite my objective was covered by Tom's British light infantry and regulars tasked with searching the buildings around to safely escort a party of officers ladies to the rear.

No matter how much fire I laid down on the cover close by the wagon, his light infantry held firm and I ended up taking my frustration out on "Mr Steve" in the sector next door by continually showering his Rangers with a barrage of arrows that took out four of their number over the course of the game.


As the two lines closed on each other as each side sought to grab the best terrain from which to run their battle, the game settled into a struggle to wear down the enemy opposite to allow more freedom of movement to do the tasks each of us had been set.

Bob manoeuvres his regulars down to the river 
A pause in proceedings, perhaps due to a shopping foray
Some rules are not particularly suitable for these kind of large friendly games, but Muskets & Tomahawks were a perfect accompaniment and kept the play flowing very well as the variation in card draw made sure that play from one turn to another was never in the same sequence.

Dress those lines
Search everything and then burn it!

My militia can only observe the wagon, my objective, over in the copse of trees opposite as Tom's light infantry and regulars refuse to budge

Indians hugging the terrain and sniping at favourable targets
My Indians, probably my best performing unit on the day, 'darkening the sky' with their arrows
British fire-power was a constant threat to troops in the open

I get some much needed support but that wagon in the trees opposite still looks a long way away
 As our game progressed some player objectives began to be achieved as the battle started to swing in different directions across the front.


The ladies are found and Tom's regulars provide a close escort as they make their way to the rear
Virginia Militia and regulars hold the cover
Another British objective achieved as French property goes up in smoke
With two British and one French objective achieved and with the day drawing to a close we called the game a British victory.


The game was a triumph of organisation and thanks go to the DWG members who provided figures and terrain to populate the Foundry provided tables, but principally to Steve M who pulled the game together and provided the bulk of figures from his very fine collection.

Thanks also to Diane and Wargames Foundry for hosting our day out. We were all made very welcome and thoroughly enjoyed the day.

Oh and not forgetting my retail therapy, aided and abetted by Mr Steve who kept thrusting packs under my nose all day, I picked up enough figures to build a Roman citizen legion together with some fine German ladies exhorting their men folk to kill lots of Romans and spare them from a fate worse than death.

Rangers cover the open ground
Before heading off to our hotel in Lincoln about forty minutes up the road, we decided to check out the battlefield of Stoke Field which is situated right next door to the Foundry workshops.

Unfortunately during our game the day had developed into perfect wargaming weather with a torrential downpour by the time we stepped out into daylight.

Thus we contented ourselves with a visit to the church next door and a drive around the back of the battle field to see the area of the "Red Gutter"where some of the fleeing rebel soldiers met their end during the rout towards the River Trent and in which several grave pits were discovered.

If you are interested, Wargames Foundry are promoting activities in support of the 530th commemoration of the battle next month and I have attached the link to their site for booking tickets.


Battlefields Trust- Battle of Stoke Field

The two World Wars are commemorated in East Stoke Church with this plaque to
the fallen, noticeably Gunner Price aboard HMS Queen Mary, the loss of which was covered
in my post on Portsmouth Historic Dockyard and the WWI exhibition.
That is an extremely large Union flag, we thought probably from a ship
The memorial stone to the Battle of Stoke in the local church close to where
most of the burial pits were discovered
The following pictures show the steep escarpment at the back of Stoke Field down which the rebel troops sought to escape at the close of the battle.


You can always tell when I have gone the extra mile for this blog when you can detect rain drops on the lens in the lower right corner of these pictures.

For a fuller understanding of the location of the "Red Gutter" area seen here, follow the link above to the Battlefields Trust site for a fuller explanation of the action together with a range of superb maps illustrating the possible positions of the two forces.


With the weather as bad as it was we contented ourselves to plan another visit to do this site justice on a future visit.

Next up the Queen's Sconce Newark and that Book Review.